switch beheer: basis
Je kan dit labo uitvoeren in Packettracer, of met je laptop en een echte 2960 cisco switch.
Packettracer Schema:
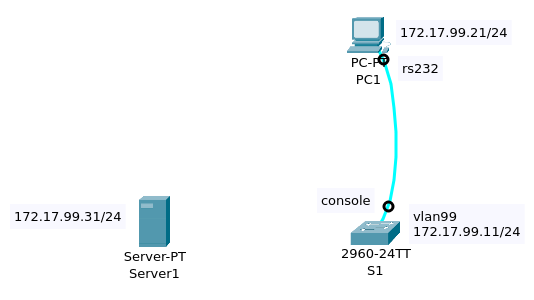
Adrestabel:
 Device    Interface    IP/Mask
 --------+----------+----------------
 S1      |  VLAN99  |172.17.99.11/24    model 2960
 PC1     |  NIC     |172.17.99.21/24
 Server  |  NIC     |172.17.99.31/24
In dit LAB:
-- Maak een verbinding met een switch via een console kabel.
-- Verken de verschillende CLI modi, leer HELP gebruiken,
-- Kijk naar de history
-- Configureer boot sequence parameters
-- Configureer een PC en sluit die aan op de switch
-- Configureer full duplex
-- Kijk naar de MAC-address table
-- Gebruik TFTP voor backup of restore
Opdracht 1: Verbind je PC met de Switch
Koppel S1 en PC1 aan elkaar met een blauwe consolekabel.
RS232 (COM) van PC1 naar de console-interface op switch S1.
Klik dan op PC1
vervolgens op het tabblad Bureaublad
selecteer Terminal op het tabblad Bureaublad.
Gebruik onderstaande standaardinstellingen voor terminalconfiguratie en klik vervolgens op OK:
Bits Per Second = 9600
Data Bits = 8
Parity = None
Stop Bits = 1
Flow Control = None
Je bent nu via terminal verbonden met S1.
Druk enter om de Switch> prompt te zien.
Je bent nu in USER EXEC MODUS (gebruikersmodus)
Opdracht 2: Navigeer doorheen de CLI (Command Line Interface) modes
-
Aan user EXEC mode
Switch>, tik?
Je ziet nu een lijst met beschikbare commandos.Exec commands: connect Open a terminal connection disable Turn off privileged commands disconnect Disconnect an existing network connection enable Turn on privileged commands exit Exit from the EXEC logout Exit from the EXEC ping Send echo messages resume Resume an active network connection show Show running system information ssh Open a secure shell client connection telnet Open a telnet connection terminal Set terminal line parameters traceroute Trace route to destinationIn user EXEC mode, heb je toegang tot een beperkt aantal monitoring commandos.
-
Gebruik
enableom naar privileged EXEC mode te gaan.Switch> enable Switch#De prompt verandert van
>naar#. -
In privileged EXEC mode, tik je nu opnieuw
?.
Je ziet nu een lijst met privilidged EXEC commando's.Exec commands: clear Reset functions clock Manage the system clock configure Enter configuration mode connect Open a terminal connection copy Copy from one file to another debug Debugging functions (see also 'undebug') delete Delete a file dir List files on a filesystem disable Turn off privileged commands disconnect Disconnect an existing network connection enable Turn on privileged commands erase Erase a filesystem exit Exit from the EXEC logout Exit from the EXEC more Display the contents of a file no Disable debugging informations ping Send echo messages reload Halt and perform a cold restart resume Resume an active network connection setup Run the SETUP command facility show Show running system information ssh Open a secure shell client connection telnet Open a telnet connection terminal Set terminal line parameters traceroute Trace route to destination undebug Disable debugging functions (see also 'debug') write Write running configuration to memory, network, or terminalJe ziet naast de eerdere user EXEC commando's een extra hoeveelheid basic monitoring commando's, configuratie en management commando's.
-
Tik
configure terminalom naar global configuration mode te gaan. In deze modus kun je een switch of een router configureren. In deze modus verandert de prompt naarSwitch(config)#
Switch# configure terminal
Switch(config)# -
In global configuration modus, tik je ook nu
?. Bekijk de lijst met beschikbare commando's. -
We gaan nu configureren, we beginnen met een
hostname. We gebruiken S1 als de hostname:
Switch(config)#hostname S1
S1(config)# -
Vervolgens geven we een ipv4 configuratie aan de switch. Hiervoor configureren we de zogenaamde
interface VLAN99(je kan ook andere VLAN nummers gebruiken)
Dit doen we met de volgende commando-reeks -- we zitten nog steeds in(config)modus
S1(config)# interface vlan 99
S1(config-if)#
S1(config-if)# ip address 172.17.99.11 255.255.255.0
S1(config-if)# no shutdown
We gaven het adres172.17.99.11/24en zetten de interface AAN metno shutdown -
Nu gaan we poort
Fa0/18vanS1configureren;
We zetten de poort inACCESSmodus
en vervolgens in de VLAN99
S1(config-if)#interface fa0/18
S1(config-if)#switchport mode access
S1(config-if)#switchport access vlan 99 - Gebruik vervolgens
exitom de interface config modus te verlaten ... -
We gaan nu de console verbinding configureren en voorzien vaneen paswoord.
S1(config)#line console 0
S1(config-line)#
S1(config-line)#password cisco
S1(config-line)#login - Tenslotte keren we terug naar privileged EXEC met het
endcommando.
S1(config-line)#end
S1#
Opdracht 3: gebruik help om de klok te configureren
-
gebruik de privileged EXEC prompt, en tik clock ?
S1# clock?
de enige optie isset - Gebruik help om uit te zoeken hoe je de klok op de huidige tijd zet
- Verifieer datum en tijd:
show clock
Opdracht 4: configureer het history commando
-
bekijk de history ...
S1#show history -
Je kan het aantal bewaarde commando regels aanpassen met het commando
history size
We zetten die nu op 35 voor zowel de console als voor de vty lijnen:
S1(config)#line console 0
S1(config-line)#history size 35
S1(config-line)#line vty 0 4
S1(config-line)#history size 35 - Kijk nu zelf na of de history buffer veranderd is ...
Ga terug naar privileged EXEC mode en voershow historyopnieuw uit Er zouden nu meer bewaarde regels tevoorschijn moeten komen.
Opdracht 5: Boot Sequence
(dit lukt alleen met echte switches, niet in PT)
-
Kijk welke Cisco IOS software version nu ingeladen is ...
S1#show versionCisco IOS Software, C2960 Software (C2960-LANBASE-M), Version 12.2(25)FX, RELEASE SOFTWARE (fc1) Copyright (c) 1986-2005 by Cisco Systems, Inc. Compiled Wed 12-Oct-05 22:05 by pt_team ...Je ziet de versie in de eerste regel ...
-
kijk welke Cisco IOS images op de
flash memorystaan:
S1#show flashDirectory of flash:/ 3 -rw- 4414921 c2960-lanbase-mz.122-25.FX.bin 2 -rw- 4670455 c2960-lanbase-mz.122-25.SEE1.bin 6 -rw- 616 vlan.dat 32514048 bytes total (23428056 bytes free)Merk op dat in het voorbeeld hierboven 2 versies in flash memory zitten. De huidige versie is
c2960-lanbase-mz.122-25.FX.bin - Configureer het systeem om te booten van een ander Cisco IOS image.
In global config mode, geef je het volgende commando in:
S1(config)#boot system flash:/c2960-lanbase-mz.122-25.SEE1.bin
Je kan dit uitvoeren in PT maar het werkt er wel niet.
Opdracht 6: Gebruik een netwerkkabel om PC1 met S1 te verbinden
-
Configureer PC1 met
172.17.99.21/24 -
Verbind PC1 met Fa0/18 op de switch.
-
Test met een
ping 172.17.99.11of je de switch kan pingen.
Kun je de PC ook pingen vanaf de switch? - Voer het volgende uit op je switch:
# configure terminal
# service password-encryption
# enable secret abc12345
(je moet nu dit paswoord intikken nadat je 'enable' hebt ingegeven)
# user testnet password sdf12345
# line vty 0 15
# login local
# transport input telnet
# end
Log nu in vanaf je PC-command prompt met telnet 172.17.99.11, user testnet en paswoord sdf12345
Opdracht 7: Configure Duplex and Speed
-
Gebruik de Config tab op PC1. zet de bandbreedte van de FastEthernet interface op 100 Mbps en Full Duplex. (meestal staat die op AUTO / auto gaat zelf kijken welke settings voor ethernet gebruikt moeten worden)
- Gebruik Cisco IOS commands om Fa0/18 aan te passen:
S1(config)#interface fa0/18 S1(config-if)#duplex full S1(config-if)#speed 100 - Test met een ping tussen PC1 en S1
Opdracht 8: Beheer de MAC Address Table
-
Controlleer het MAC address van de server en schrijf het op.
-
Configureer een static MAC voor de TFTP server. Op die manier weet de switch altijd waarnaartoe TFTP te sturen.
Dat doen we als volgt:
S1(config)#mac address-table static 0060.3EDD.19A3 vlan 99 int fa0/24
(gebruik het juiste server-MAC-adres) - Controlleer
S1# show mac-address-tableMac Address Table ------------------------------------------- Vlan Mac Address Type Ports ---- ----------- -------- ----- 99 0060.3edd.19a3 STATIC Fa0/24 99 0060.5c5b.cd23 DYNAMIC Fa0/18
Opdracht 9: Beheer van de Switch-Configuration-File:
-
verbind de FastEthernet port op de server met Fa0/24 op the switch.
-
Zet poort Fa0/24 in vlan 99 ...
S1#configure terminal
S1(config)#interface fa0/24
S1(config-if)#switchport mode access
S1(config-if)#switchport access vlan 99 -
Verifieer of S1 de server kan pingen en/of omgekeerd
-
Maak een back-up van de startup-configuration op je server. In privileged EXEC mode, copieer je de startup configuration naar de sever. Kijk of TFTP op de server aan staat en indien niet, activeer de service. Als server adres kies je 172.17.99.31. Als destination filename, kies je de default filename door
te drukken.
S1#copy startup-config tftp:
Address or name of remote host? 172.17.99.31
Destination filename [S1-confg]? [Enter] - Verifieer of de server een startup configuratie heeft ontvangen in zijn filesysteem. klik op de server daarna op de config-tab. De S1-confg file zou gelist moeten staan onder services -> TFTP. (noot: een restore van een file vanaf een server is in PT niet ondersteund)